Tackling the Solarium
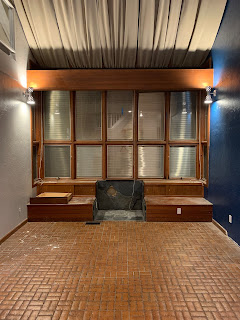
The listing for our house described this unique room as the solarium, and the name has stuck! It was a room with a lot of issues: leaking windows in both the ceiling and walls, harsh and cold '80s tile floor, built in benches taking up a lot of space along the windows, and even a water spigot in one wall. The room was drafty with lots of gross old curtains to try to keep the heat in (or out in the summer), and felt like it was closer to an outdoor space than an indoor one. The room is two stories tall and visible from the great room, so we needed to make the right choices to make it fit.
After a lot of thinking about the possibilities, it was demo time! This entailed removing the roof and walls, really opening up the house in the hottest part of the summer - but it was totally worth it!

Once we got the new windows in and new walls with good insulation, plus fully opening skylights with remote operation, the room really became part of our indoor usable space. It stays cool in the summer and warmer in winter, so the next step was to deal with the "unique" tile to finish making the room more comfortable. After originally planning on leaving the tile and using rugs (the tile is laid directly into 3" of concrete), we learned that we could lay LVP over the top of the tile.
We had the most amazing one-man crew lay this LVP. Due to the extreme texture of the tile, he spent a whole day grinding the tile down getting it flatter, then spreading leveler to finish prepping the floor. Two days of laying the planks, one day of putting in the baseboard, and our floor was done. We were able to take this flooring throughout the entry way, laundry room, and solarium. Now we get to figure out furniture so we can start using this great new space!


Comments